
Good morning to you all! I am thrilled to be able to do the Method Monday post for InStyle Stamps for the day! (You may have also seen this post in the ISS blog today)
I have wanted to do an "Aperture" card for a while now and this was about as good a time as any to give it a try!
First thing you need to do is to gather all of your supplies. I used a Score-Pal for my score lines, but there are many other ways to score if you don't have one.

I am going to show you how to do a double fold card with the frame cut out of the front. I started with a piece of cardstock measuring 12" x 5.5". Your finished card won't quite be as wide as an A2, but its pretty close and will fit into an A2 envelope.


So! Now its your turn to go try an Aperture card! Please play along with us and then leave a comment if you do so that we can go check out your creation! Thanks for joining me today! Have great Monday and a fabulous week!

Score along the long side of the cardstock at 4" and at 8". Then you want to fold over the right side into the middle first then the left side into the middle on top of the other piece that was just folded in.
Next you want to decide what shape you want the frame to be in the front of your card. You could use a Nestabilities oval or rectangle to cut out the center of the front, or even a punch or Coluzzle. I chose to put a frame on the front then to cut out inside of that.

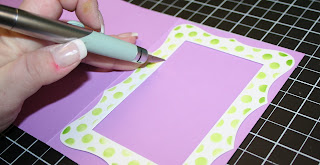
This is the Polka dot frame from Spellbinders. I cut it out of a separate piece of white cardstock on my Cuttlebug and then embossed it.

While the piece was still in the die I airbrushed inside the openings with a copic marker (My colors are all listed at the bottom of the post).

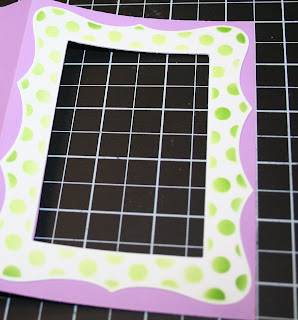
I then attached this frame to the front or top panel of my card. After that I used an exacto- blade and cut out the center of the frame on the purple cardstock that showed through. (I also made a second frame and attached it to the back of this panel on the inside which can be seen further down in this post)

This is what the front will look like at this point. Now its time to work on the inside.

The panel that shows through the frame I wanted to jazz up a bit. So I added a layered panel of cardstock with a grass border that I punched with my Martha Stewart Icicle punch. This was then centered on this part of the purple card base.

My main image for the front is this adorable bunny digi stamp, which is NEW sneak peek from InStyle Stamps and it will be available March 5th at the webstore! Its called "Sweet Treats". I closed the card front so that I could center the bunny in the middle of the frame. I popped him up with some dimensionals.

Here is the front of the card after I added a few embellishments...a touch of ribbon from my stash (Fancy Pants I think??), and some die-cut and airbrushed flowers from the same Polka Dot Frame set by Spellbinders.

I also dressed up the inside of my card a bit using another new sneak peek digi image which is also available March 5th from InStyle Stamps, called "Eggtastic"! It was so fun to color...more fun than real dyed eggs, KWIM?
You can also see where I added the second frame to the inside of the card so that it didn't look so plain. Below are the copics that I used to color these images. All of my supplies are listed at the bottom of the post.

So! Now its your turn to go try an Aperture card! Please play along with us and then leave a comment if you do so that we can go check out your creation! Thanks for joining me today! Have great Monday and a fabulous week!
-Cyndi
- Supplies:
- Stamps: Eggtastic, Sweet Treats (InStyle Stamps)
- Ink: None
- Paper: Purple, Green, Turquoise cs (Core'dinations); white cs (Neenah); stripes (Pinecone Press)
- Accessories: Score-Pal; exacto; cutting mat; Polka dot Frameabilities (Spellbinders); buttons (Basic Grey); ribbon (Fancy Pants); icicle border punch (Martha Stewart); Copic markers: RV00, RV02, RV06, RV09, V01, V04, V06, Y11, Y15, Y17, YR02,YR04, YR07, YG11, YG13, YG17, BG11, BG15, BG18, C0 & ABS1 (Imagination International)
Awesome tutorial Cyndi! Now, all I need is the airbrush system! : )
ReplyDeleteThis totally sold me on the airbrush system, too! My poor wishlist - it is a mile long ;) You really did a great job with this!
ReplyDelete