Showing posts with label tsukineko. Show all posts

Monday, March 3, 2014

Clear Scraps project for Ink, Paint, Stamp!

For those of you that haven't heard, I'm now working as the manager at a new store in High Point called Ink, Paint, Stamp!  We'll be open for business the beginning of April, but in the meantime we've been busy ordering and laying out the new store.  I did get a chance to put together a mini album the other day:


We received a huge shipment from Clear Scraps and they were generous enough to send us a few samples to play with including this adorable Lacey mixables album.


It came as a kit with precut papers and embellishments, but I changed it up with some different products that we'll be carrying in the store.


The paper line is called Art of Life collection from Kaisercraft.  I also used black Staz-on, some Tim Holtz stamps, and some flowers from Petaloo.


Ithink it turned out super fun, sorry for the bad pics though, they were taken at work.  I'm still trying to get my craft room together after the move, LOL


I am so thrilled that we'll be carrying a huge variety of Clear Scraps products, I've alway loved their albums and acrylic shapes and I'm totally excited to work with their  new mascils and more!


Hope you have a fabulous Monday!

Wednesday, October 16, 2013

Stampendous and 3L Scrapbook Adhesives

Good morning!  This week Stampendous is teaming up with Scrapbook Adhesives by 3L.  I have a card for you peeking one of the newest Jumbo Stamps,  Top Hat Snowman.  Is he the cutest little fat snowman ever or what?


He's been stamped and embossed with Vintage Mahogany Tinsel, colored with my Copics and then cut out and popped up with my favorite ever dimensional adhesive,  Crafty Foam Tape.  It comes in a big roll and I can tear off whatever length I want instead of having to use a million foam squares!


My background was stamped with one of the other stamps in the set, repeating over my entire background in Festve Berries Distress ink.  I also added a touch of Washi Tape and a button on top of that using Dodz (a double sided adhesive like a glue dot).


Supplies:
Jumbo Top Hat Snowman (Stampendous)
Vintage Mahogany Embossing Tinsel (Stampendous)
Festive Berries Distress ink (Ranger)
Versamark Ink (Tsukineko)
Kraft, White cardstock
Dodz, Crafty Foam Tape, My Stik (3L)
Washi tape (Bella Blvd)
Button (stash)
twine (May Arts)
Copics (E79, E74, E71, R89, R59, R29, R27, G24, G21, B21, YR14)

Playing today:

Stampendous Impressions

Scrapbook Adhesives Blog

Jamie Martin

Krissy Fossmeyer

Lea Kimmel

Rhea Weigand


Thursday, August 9, 2012

Tips and Tricks Thursday

I'm up for Tips and Tricks Thursday at the Skipping Stones Design Blog today!


I am  sharing with you one of my new favorite mediums along with some silhouetted Skipping Stones Design stamps!  I fell in love with the new Dylusions ink sprays from Ranger the minute they came out because the colors are so fresh, bright and funky!

Today I am sharing some tips from videos and tutorials I have seen from Dyan Reaveley and local stores.


I started with a plain old manilla tag and sprayed it with water.  Then I added Pure Sunshine, Bubblegum Pink, and Fresh Lime sprays and a bit more water.

Squish two tags together then absorb some of the moisture with paper towels.  Heat with heat tool on both sides to help it lay flat.

I then stamped a bunch of stems/branches/sprigs with Heartsong 2 and  Beautiful Botanicals, both found in the webstore <---- to the left.  All stamping was done on Versafine Onyx Black ink.


I then went back and added color to my leaves with more of the Fresh Lime using a water pen dipped directly into the bottle.  I added some Orange to the bird to make him pop a bit more.


And here's the final tag once I added some May Arts ribbon and sentiment.


Tuesday, July 17, 2012

Skipping Stones Tuesday

Its time for a new inspiration challenge at Skipping Stones Design and this week its a color combo and/or trigger photo.  You have all week to enter and one lucky winner will win an SSD stamp set of their choice!  SO go get stamping!


When I spotted the map I thought of this What's Up paper from Basic Grey that just also happened to have balloons, so guess what stamp set got pulled out?  Uplifting!   I started by spraying all my papers with Frost and Copper Sheer Shimmer Spritzs from Tsukineko.  All edges were then inked with Smokey Gray Versafine (Tsukineko).  


I then heat embossed my 3 balloons (and the sentiment) with Sepia Versafine and clear EP.  I cut the balloons all out and popped them up with Crafty Foam tape.


Here's a closer shot at the sentiment (one of many from the Uplifting set)


Challenge List:
Make It Monday: linky party


Monday, July 16, 2012

Sweet 'n Sassy Summer

Just a little extra post for you today since I didn't have anything scheduled :)  Since its soooo hot out I'm bringing you a tropical hello with Palm (Coconut) Tree and Sunshine digi stamps from Sweet 'n Sassy Stamps!  


I just had to color these in bright fun colors with my Spectrum Noir markers to match some old but loved Echo Park papers from the Splash and Summer Days collections.


Sentiment is also from the Sunshine digi stamp collection from SNSS.  Ribbon from Bo Bunny, and edges were inked with Versacolor pads from Tsukineko  (Canary, Celadon, and Lime)


I used this week's Sweet Sunday Sketch for my layout.


And don't forget you still have a few days left to play along with this weeks Fun Fold Challenge at SNSDC!  Then this Friday is new release and Blog Hop day!!

Challenge List:
Pile it On: Kick back and Relax!
Crafty Bloggers Network: anything goes
Inspire me Friday: anything goes
Totally Papercrafts: lots of layers


Saturday, July 14, 2012

Stampendous and Envirotex Blog Hop

Thanks for joining the Stampendous gals today for a fun hop! We've been enjoying the fun crafting potential of combining our fantastic stamp images with EnviroTex Jewelry Resin from Environmental Technologies. Carmi Cimiata of the Resin Crafts Blog has helped us learn so much about how this product works, what it can and cannot do. We're so appreciative of her and the folks at ETI who sent us all some resin to play with. {big round of applause!}

 We've prepared some fantastic projects to inspire you today. We hope you'll run over to your local Michaels or other craft store and pick up some resin and some Stampendous stamps and get playing. If you make something fun, please take a picture and put it on our Facebook page! We'd love to see what you're doing! As you visit each blog, you'll be entered in our drawing for a great prize package when you leave a comment! If you don't tell us you were there by commenting, we can't include you in the drawing! We'll pick a winner from today's comments separate from the commenters throughout the week. Get hoppin!


For my project today I used a new set called Jumbo Snow that should be arriving in local stores any day now!  I started by stamping my background in various sizes of the snowflakes with Versamark ink (from Tsukineko)then heat embossing with Aged Marine Embossing Enamel (also new).  

On a small metal edged tag (from my stash from years ago...I think they were from Making Memories) I stamped the large snowflake and heat embossed with the same ink and powder.

Next I poured some of the resin onto the tag, sprinkled on some Champagne Glass Glitter, Steel Blue Glass Glitter, and Pearlized Mica Fragments then topped that off with more resin.  After this dried totally I had to cut a small amount that overflowed from around the edges using my Ranger scissors.

Lastly I matched up the snowflake over the matching one on the cardstock base and glued it on with red line adhesive since its a bit heavy for an embellie.


OK, so here's the hop order, don't forget to comment along the way!


Whats up Pussy Cat?

I totally couldn't resist this last week's challenge from The Cat's Pajamas to use THIS TEMPLATE in TCP Splicoast Stampers page to create a shaped card.  Cause guess what? The first ever Cat's Pajamas stamps that I bought were Sprinkle Annette and Moon Doggie.    


I mean just how perfect are they for this fun summer card??  I also used papers from Fancy Pants and Piggy Tales for my card and gems from Hero Arts.  Images were heat embossed with Versafine ink (Tsukineko) and clear detail powder then colored with my Spectrum noir markers.


Sentiment is also from TCP called "What part of Meow".  Here's what the final card looks like at a slight angle for better viewing :)


Challenge List:
The Cat's Pajamas: technique
Pile It On: kick back and relax
Forever Friends: Summer holidays
Tuesday Throwdown: Hot colors
Card MAd Fairy: summertime
Make It Monday: linky party


Monday, June 25, 2012

Stampendous and Clear Scraps Week!


Are you ready for a week of clear sparkly fun from Stampendous! and Clear Scraps this week?  I have always loved my Clear Scraps albums and pieces but sometimes forget to use them so I was mega excited about this collaboration!  

You'll see projects from both teams all this week ending with a Blog Hop this Saturday so don't miss out!!  I was sent a couple of things in the mail from Clear Scraps including the card that I used fo today's project.  The cards are called "Send It Clear" and I received the Belgrave version.

We Stampendous! girls were also gifted with some fun inks from Tsukineko and mine happened to be blues so I went with a winter theme.


Below is the inside of the card....its a gate fold card with three clear pieces that are held together with super-invisible clear stickers.  I made mine open top and bottom instead of side to side to accomodate the Joy Sparkle stamp.  Joy was stamped in Hydrangea Blue Staz On ink onto some Martha Stewart Winter Wonderland paper that I got from Michael's.    I then sprayed that piece with Sparkle Sheer Shimmer spritz.   I also distressed the edges with the Hydrangea Blue ink then added some Shabby Blue Embossing Enamel to two of the corners using Versamark ink. 

 Lastly I added some Multi Crystal UF glitter with Glossy Acccents.  I cut this piece slightly smaller than the clear piece and adhered it to the front of that piece with Beacon Fabri-Tac adhesive.  I cut another piece of MS paper the same size as the clear piece and stamped it in Hydrangea Bue ink using the two small snowflakes from Yule Penguins Perfectly Clear set.


The next photo is of the bottom gate closed and the top open so its easier to see whats on what layer :)  On the 2 front gate pieces I stamped the asterisk (snow) border from Jumbo Joy Sparkle set in Baby Blue Staz On Opaque ink directly on the clear plastic.


To each of the gates I also adhered a small strip of the darker blue paper that was Fran'taged on the edges with more Shabby Blue EE and inked with more Hydrangea Blue ink.


Here's a closeup of the BG piece as well as the Embossed corners and the glitter on the snowflakes.


And lastly this shot is of my ribbon treatment.  I tied some Sheer light blue ribbon by May Arts and some sparkly silver ribbon from Michaels to a clear button using White embroidery floss then glue dotted this on a snowflake.  The Snowflake started as a White Velvet Class-a-Peel Sticker by Stampendous!  I inked it with Sky Blue Versacolor ink then embossed it with Clear embossing Powder.


Stampendous! Products:

Clear Scraps Products:

Tsukineko Products:


Prize Package includes (we have 3 to give away):
2 – Send It Clear Cards (no choice of style)  - http://www.clearscraps.com/category_s/69.htm
1  - additional Clear Scraps product (varies)
1 – pkg Imagine Crafts Ink Blushers - http://www.tsukineko.com/new.php
1 – colored StazOn ink pad (no color choice) - http://www.tsukineko.com/store/cart.php?m=product_list&c=25
1 – opaque StazOn ink pad (no color choice) - http://www.tsukineko.com/store/cart.php?m=product_list&c=25
A selection of Stampendous Cling Rubber, Perfectly Clear Stamps and Class A’Peel Stickers (selection varies)


How to enter/Win:
  •  one package for commenting on Designer’s Blogs during the 5 weekdays.
  • One for commenting on ClearScraps/Stampendous blogs during the weekdays,
  • And one for commenting on the Blog Hop.  


Tonya http://creativit-tonya.blogspot.com/


Tuesday, April 10, 2012

Painting with Powder with Stencils!

Get ready to be inked, pasted, encrusted, stenciled and stamped! All of this week the Dreamweaver Stencils' Dream Team and the Stampendous Design Teams will be providing some "Dream-pendous" inspiration for you, with multiple opportunities to win some fabulous prizes from both companies. Each day this week, you will be directed from both the Stampendous Impressions' blog or the Dream It Up! blog to the players du jour for your oohing and aaahing pleasure. Everyone will be playing on Saturday, the 14th with our final hop for the week. This is your opportunity to see how to mix and mingle your creativity...if you are a stenciler, you will be fascinated at combining stamps with your first love. If you are a stamper, you will be wowed at how stencils can add to your impressions.


I had a lot of fun mixing products and techniques for this card!  I started with LL588 Dragon stencil from Dreamweaver Stencils and dry embossed the dragon onto the white pattern paper.  Next I added Versamark Ink to the open areas using a large dauber.  After I removed the stencil I sprinkled 4 colors of Stampendous! embossing powder onto the dragon using the Painting with Powder technique.  Chinese Red, Parprika, and Ruby Red EP are all found in the Scenic Collection and I accented the dragon with Pirate Gold EP.


I also used the same technique to emboss one of the lanterns from LL550 Party Lanterns and then cut this out to add as an embellishment.  On the side panel I stamped the large circular medallion from Jumbo Thinking of You and embossed it in more of the Pirate Gold EP.


Most of the edges of my card stock were distressed with Vintage Sepia Versafine ink from Tsukineko and/or encrusted with Stampendous! powders and mica fragments.  All papers are from the Basic Grey Konnichiwa paper collection.


Be sure to leave comments as you tour the blogs (with your email addy!) for a chance to win* one of three combined sets of these Dreamweaver and Stampendous goodies:


Leave me some love before you "gear up" for the next player:


*For shipping and handling purposes, USA/APO/FPO/Canada winners only.

Thanks for coming by today and be sure to stop back Thursday and Saturday for more!

Sunday, April 8, 2012

Stampendous! meets Altered Alice

Happy Easter!  I hope you are all enjoying time with your families and the long weekend if you have one!  Today I have a project for the Altered Alice Challenge.  All month Stampendous! will be partnering with Altered Alice with lots of samples using the Wonderland set and more!


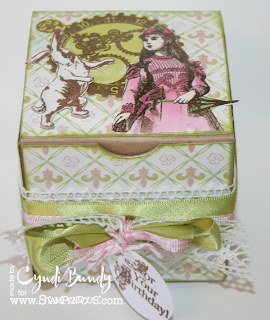
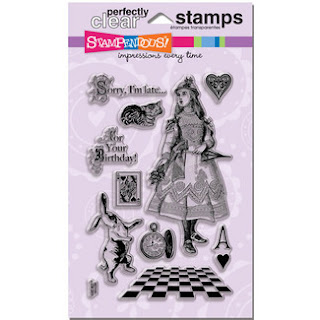
I started with a small 3" x 3" kraft box which I covered with new Delightful paper by Authentique.  Before gluing the pieces to the box I edged them all with Pearlescent Thyme Brilliance Ink from Tsukineko.  I then stamped Alice and the white rabbit from Stampendous' Wonderland set in Vintage Sepia Versafine ink by Tsukineko and embossed it with Clear detail powder from Stampendous!  The gear watch face in from the new Steampunk Gears coming SOON to a store near you!


Alice and the White rabbit were colored with Copic markers (R81,83,85, Y23, E0000,E000,G81, and CO)  These two images and the watch face were adhered to the top of the box.


I then wrapped May Arts white crochet ribbon along with Green satin PTI ribbon and pink gingham around the box and added a knot of the three tied into a bow.  My tag is stamped with one of the greetings from the Wonderland set and punched with a 1 3/8" circle then tied on with pink Bakers Twine.


Ihope you like my project today!  Please visit the Altered Alice blog for more inspiration from their team and the Stampendous! team AND for a chance to win one of three of the Wonderland sets!  

ALSO, don't forget to go back to the top of my blog and enter my Blog Follower Giveaway for another chance to win this set or one of three other prize packs!


Tuesday, March 20, 2012

Plume Portrait

Its a beautiful day here in NC and the signs of spring are everywhere!  I am finally feeling almost back to normal after the flu has left my house (I hope!).  This morning I have a bit of a romantic card for you featuring this Victorian beauty called "Plume Portrait" from Stampendous!  This stamp is being featured on the Paper Crafts Magazine page today so you will see samples of her popping up all over the Stampendous! DT blogs.


For my card I started out by stamping Plume Portrait in Vintage Sepia ink (Tsukineko) onto white cardstock.  I then spritzed a bit of Tattered Rose Glimmer Mist from Tattered Angels and trimmed her.  This panel was mounted onto a burgundy piece of cardstock that I Fran'taged with Shabby Pink Embossing Enamel and Bronze Crushed Glass Glitter.


My background medium pink cardstock I stamped with Peacock Points in Versamark ink and embossed with more of the Shabby Pink.  Over the top of that I stamped Flying Machines in Vintage Sepia.  More shabby pink was added to one corner.


I added the pink background to my burgundy base (after adding mats of course) and then added a piece of White crochet ribbon from May Arts and a flower from Prima that I spritzed with Starfish and Creme de Chocolat Glimmer Mist.


WOULD YOU LIKE TO WIN the Cling Plume Portrait stamp? Paper Crafts Magazine is giving away this stamp on their Facebook Page today. You can find Paper Crafts Magazine Facebook page here. Find the PC Magazine post offering Plume Portrait, comment on that post and for your chance to win.

Stampendous is also giving away FREE stamps!! Jump over to the Stampendous Blog and leave a comment there for more chances to win!!!