Thursday, February 28, 2013

Ring me up

Are you ready for another edition of Love and Friendship from Dreamweaver Stencils?  What a fun and versatile challenge theme we have had this month!  Plus you still have one week to play along with our February challenge for a chance to win a new stencil!


My card today is a bit neon, but oh so my favorite colors...lime and teal!  And add a little black for some pop and you can never go wrong :)  This new adorable and retro Telephone stencil from DWS was the first of the newest stencils that I couldn't wait to play with!

I used the Double Glitter technique for this one with Tim Holtz Dry Stickles glitter in Turquoise, Lime Green, and Stardust.  I just happened to have some Best Creations Glitter paper that coordinated!

The cute little Hello from the Birthday Words stencil is the perfect companion for the phone!

Please visit my teammate's blogs this week and see what they've been up to!


Tuesday, February 26, 2013

Stampendous Love is in the Air Challenge

 Have you played along with the February challenge from Stampendous yet?  The theme this month is "Love is in the Air" and you can get all the details HERE.


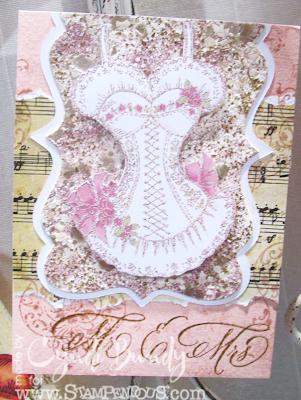
For this card that I sent to the CHA booth I stamped Ruffled Corset in Aged Rose Embossing Enamel onto white cardstock and then colored the flowers with Spectrum Noir markers.

The die cut background was created using powders, glitters, and mica from the Pink Encrusted Jewel 5 Jar Kit (which includes Aged Rose and Shabby Pink Enamels, Champagne Glass Glitter, Rose Color Fragments and Pearlized Mica Fragments)  Sentiment is the new Married Monograms.


I hope you'll play along with us this month!  Have a great week :)

Monday, February 25, 2013

Courage is being yourself...

Have you played with the new Tim Holtz Distress paints yet? Oooo.  And mixing them with Dylusions spray inks...fabby!  PLUS I ordered a lot of the newest stencils from The Crafter's Workshop and I am in serious love!  But I'm getting ahead of myself...

  I am mile high in Stampendous catalog samples for the new April catalog so I've been a tad busy the last few days.  But I have an Art Journal page that I created last week to share with you today.


My page uses lots of the new stencils from The Crafter's Workshop, mostly from Julie Fei-Fan Balzer.  I met her at CHA and she is a hoot!  Totally talented and so full of personality!

I began my page by playing around with my new Tim Holtz Distress Paints, and oh my goodness are they fun!  I simply used the dauber to create some large circles then sprayed on lots of water to see all kinds of fabulous dripage!!  Next (while that layer was still wet) I sprayed some Dylusions inks through a couple of TCW background stencils.


See???? Pretty fun colors and drips and mixing!  The dylusions and distress paints work beautifully together!!  After that was all dry I used the new Corn Flowers Stencil by Julie Fei-Fan Balzer from The Crafter's Workshop and applied Adirondack Pitch Black Acrylic Paint (its actually in a dauber bottle too but I just poured some out on my craft mat)  through the holes using a makeup sponge.  This stencil is just gorgeous.  I only got the 6x6 so far but now I need the 12x12 version of it too!  Did you know that all TCW stencils come in both sizes?


There's more of the Adirondack paint around the edges of the page then I sprayed new White Linen Dylusions Ink Spray through Tiny Circles over parts of the black.


This new sentiment from Tim Holtz Stampers Anonymous set Way with Words was a perfect addition to my page.  These stamps aren't yet available in stores til next week, but I got lucky at CHA during a Facebook giveaway!

Well, as you can tell I had a blast working on this page.  In fact I will be doing a class at The Stamping and Scrapbooking Room in NC on art journaling.  It will be full of ideas on mixing in paint, gesso, embossing pastes and cremes with your sprays!  Email me if you're local for class details TBA.

Products used:
Tim Holtz Distress Paint: Picked Raspberry, Spiced Marmalade
Dylusions Ink Sprays: Funky Fuchsia, Squeezed Orange, White Linen
The Crafters Workshop stencils: Tiny Circles, Corn Flowers, Aboriginal, Layered Beads
Sharpie White paint pen
Dylusions Art Journal


Thursday, February 21, 2013

Art Journaling with Dreamweaver Stencils

Its my turn over at Paper Craft Planet for our weekly Dreamweaver Stencils tutorial and today I am using my stencils in my Art Journal.  This is the page that I created:


I began by spreading Seedless Preserves Distress Paint onto my pages.  I then added Peeled Paint Distress Paint to the bottom of the page and Adirondack Aqua acrylic paint to the top.  I spritzed the pages heavily with water and let the paint drip and blend a bit and then wiped up some excess with a paper towel.


Next I masked off the top part f the pages and then sprayed white ink through the DWS Mosaic Swirls stencil, repeating this across the middle of the page.


This is what the page looked like at this point:


Next I used the Paisley background stencil and sprayed Green Tea Memories Mist in the same manner.


I sponged Black acrylic paint through the Butterfly stencil, carrying the paint slightly on the outside of the stencil and connecting the paint to some of the edges to "ground" the butterflies.


This is what the butterflies looked like:


I thought it would be fun to add some texture using the grass portions of the Mushroom stencil.  Using a Spectrum Noir marker I drew directly through the grass areas and then connected them after removing the stencil.


Next I thought I would add some embossing paste for texture, and I actually didn't even tape the stencil down.  I applied it in different parts of the stencil randomly around the edges scraping it on like one would use gesso.  The stencil used for the border is Large Flourish.


I finished the page off by painting a half #10 tag with the Seedless Preserves and spraying the same colors and stencils that I used on the background then added a sentiment from a new Tim Holtz set.  

Here is a closer shot of the spray, paste, and painted sections where the overlap.


Hope you enjoy!  And don't forget it's time again for the Dreamweaver Stencils Love and Friendship Challenge over at the Dream It Up blog! sure to check out what the Dream Team has for you this week:


Sunday, February 17, 2013

My first attempt at Gelatos

Good morning!  I thought I would share some Art Journal pages that I finished a while back but never blogged about!  This was my forst attempt at using Gelatos from Faber-Castell and while I have since learned a bit more I did love the way the pages turned out.


I began by brushing a layer of Claudine Helmuth Gesso over both pages and let that dry.  Next I picked  peach, pink, orange, and red from my Gelatos Gift set  and colored those randomly over the pages.  I used a large flat brush from Claudine Helmuth (Ranger) with water to gently blend the colors.


The background red flowers are from Dyan Reaveley's How Does Your Garden Grow set (Ranger) that were colored with Red Gelato and then spritzed with water.  The birds are from the same set and were stamped with Archival black ink then colored in with Gelatos.


The leaves were also colored with Gelatos, the rest of the images were colored with Dylusions ink sprays in Tim Holtz Water Brushes.


I added a coat of Claudine Helmuth Studio Multi Medium over the images and also used it to adhere my cut out pieces to my pages.

I will be sharing more Gelatos projects soon!  I've had more time to play with them a bit plus I spent some time at the Faber-Castell booth at CHA.

Thanks for stopping by today!
-Cyndi

Saturday, February 16, 2013

Doctor Who

Good morning!  I have a quick post for you today before I'm off to help with Make-n-Take Day at Betty's!  I haven't posted anything Stampendous this week so here's another darling new Kiddo for you.  This Doctor Kiddo.


The background was stamped with the Distressed Type background and then I ran it through my Cuttlebug with a mesh folder.

OK, nice and simple card and quick post.  Who knew I had it in me?  LOL

Hope you have a great weekend...its snowing here!!

Thursday, February 14, 2013

Love and Friendship...

I'm back with another round for the Dreamweaver Stencils Love and Friendship February Challenge!  I created this card for the DWS CHA booth using the new Leafless Tree Stencil and thought it would be a great friendship card.


I laid the stencil over my pattern paper and dabbed Ranger Watermark Resist Ink through the holes with a large dauber.  Next I poured on Vintage Photo Distress embossing Powder (after removing the stencil) and then heated it.  I used a small dauber to add leaves to the tree with Tim Holtz Peeled Paint Distress Ink.  The blossoms were simply dotted on with my Tim Holtz Barn Door Distress Marker.


The sentiment at the bottom is part of one of Tim Holtz's new (and not yet released) stamps that I got FREE and autographed at CHA!  I colored on the part I wanted with my Peeled Paint Distress Marker.

 I hope you will play along with our challenge this month!  And please hop over to the rest of the team's blogs and see what they created this week!

Wednesday, February 13, 2013

Live Bravely

I have another Art Journal page pair for you today.  I started working on these at the Crafter's Workshop booth at CHA during their playtime.  Nathalie Kalbach from Germany was the TCW designer at the booth when I created these.


Going with Nathalie's style I used medium size stencils (the holes in the stencils, not the stencil itself) with spray inks (Dylusions and Adirondak).  Next we added the largest pattern stencils using acrylic paint and a makeup sponge.


Then for more fun texture we used Special Effects paste from Viva Decor on the smallest stencils. 


At that point my page lacked any coherence since we were using 6x6 stencils (everyone else was doing #8 tags) and there were no 12x12 ones available to play with at the booth.


So I did what any good artist does and finished it when I got home.  I waited for my LSS to get Dina Wakley's new Silhouette stencils (From Crafter's Workshop) and then stenciled through the large opening of one of the gals (from Casey and Penelope) with Burnt Umber paint.  I then added more of that around the edges to bring it together and finally added my journaling in white sharpie poster paint.


I'm pretty happy with how the spread turned out and love the fall colors with a touch of bright lime!


Monday, February 11, 2013

Mixed Media with Spectrum Noir

Happy early Valentine's Day!

Its my turn on the Spectrum Noir blog today and I have a mixed media tutorial up today!  Find out how I mixed my Spectrum Noir reinkers with wet acrylic paint to create the background on this card:


Ink: Spectrum Noir reinkers (PP3, PP5, CR11, DR5, blender solution)(Crafter's Companion
 Archival Black ink (Ranger)
Cardstock: Pink & Black (Core'dinations); White Watercolor paper
Accessories: Claudine Helmuth Studio Gesso (Ranger)
Spectrum Noir markers (Crafters Companion)
Glossy Accents (Ranger)


Friday, February 8, 2013

Spectrum Noir Love Challenge

Have you played along with the latest Spectrum Noir challenge?  It's all about love this month and you still have a week to join us!  The challenge runs through February 14th and you can get all the details HERE.

I used the newly released Florence from the brand new Angelica and Friends line.  These are just the most adorable little girls ever and so fun to color!


My papers are new Just Because from Little Yellow Bicycle, and my sentiment is a sticker from the same line.  I also added some May Arts Red twine and used a frame cutting die from Lifestyle Crafts.


Spectrum Noir colors used:
BT9, BT7, BT5, BT4, BT2, BT1
EB5, GB10, GB8
TN2, FS9, FS8, FS4
DR3, PP5, PP3, PP1
DG2, DG1


Thursday, February 7, 2013

Furrever Friends


This month is all about CAS Love and Friendship at Dreamweaver Stencils!  All month you can play along with the challenge at the Dream It Up blog


For today’s card I used the newly released Dog stencil and the double glitter technique.  (Is he the cutest little pup or what?!!)  Using double sided mounting paper I added Tim Holtz Dry Stickles Glitter in Cinnamon, Turquoise, and Stardust.  His nose is done in a pink from Art Glitter.


The sentiment is also from a newly released stencil…Dog Words.  Paper is from Basic Grey and ribbon by Bo Bunny.  AND I managed to keep it almost CAS!  Yeah me :)

Be sure to check out what the rest of the Dream Team created this week too!