Tuesday, April 10, 2012

Painting with Powder with Stencils!

Get ready to be inked, pasted, encrusted, stenciled and stamped! All of this week the Dreamweaver Stencils' Dream Team and the Stampendous Design Teams will be providing some "Dream-pendous" inspiration for you, with multiple opportunities to win some fabulous prizes from both companies. Each day this week, you will be directed from both the Stampendous Impressions' blog or the Dream It Up! blog to the players du jour for your oohing and aaahing pleasure. Everyone will be playing on Saturday, the 14th with our final hop for the week. This is your opportunity to see how to mix and mingle your creativity...if you are a stenciler, you will be fascinated at combining stamps with your first love. If you are a stamper, you will be wowed at how stencils can add to your impressions.


I had a lot of fun mixing products and techniques for this card!  I started with LL588 Dragon stencil from Dreamweaver Stencils and dry embossed the dragon onto the white pattern paper.  Next I added Versamark Ink to the open areas using a large dauber.  After I removed the stencil I sprinkled 4 colors of Stampendous! embossing powder onto the dragon using the Painting with Powder technique.  Chinese Red, Parprika, and Ruby Red EP are all found in the Scenic Collection and I accented the dragon with Pirate Gold EP.


I also used the same technique to emboss one of the lanterns from LL550 Party Lanterns and then cut this out to add as an embellishment.  On the side panel I stamped the large circular medallion from Jumbo Thinking of You and embossed it in more of the Pirate Gold EP.


Most of the edges of my card stock were distressed with Vintage Sepia Versafine ink from Tsukineko and/or encrusted with Stampendous! powders and mica fragments.  All papers are from the Basic Grey Konnichiwa paper collection.


Be sure to leave comments as you tour the blogs (with your email addy!) for a chance to win* one of three combined sets of these Dreamweaver and Stampendous goodies:


Leave me some love before you "gear up" for the next player:


*For shipping and handling purposes, USA/APO/FPO/Canada winners only.

Thanks for coming by today and be sure to stop back Thursday and Saturday for more!

Monday, April 9, 2012

Dreamweaver Stencils Stampendous! Hop Week!


Get ready to be inked, pasted, encrusted, stenciled and stamped! All of this week the Dreamweaver Stencils' Dream Team and the Stampendous Design Teams will be providing some "Dream-pendous" inspiration for you, with multiple opportunities to win some fabulous prizes from both companies. Each day this week, you will be directed from both the Stampendous Impressions' blog or the Dream It Up! blog to the players du jour for your oohing and aaahing pleasure. Everyone will be playing on Saturday, the 14th with our final hop for the week. This is your opportunity to see how to mix and mingle your creativity...if you are a stenciler, you will be fascinated at combining stamps with your first love. If you are a stamper, you will be wowed at how stencils can add to your impressions.

Today you can find inspiration at the following blogs:


Sunday, April 8, 2012

Stampendous! meets Altered Alice

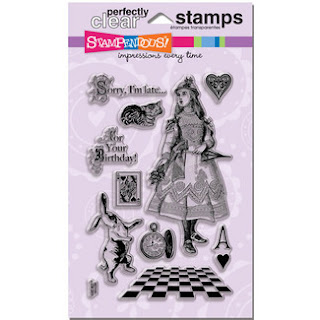
Happy Easter!  I hope you are all enjoying time with your families and the long weekend if you have one!  Today I have a project for the Altered Alice Challenge.  All month Stampendous! will be partnering with Altered Alice with lots of samples using the Wonderland set and more!


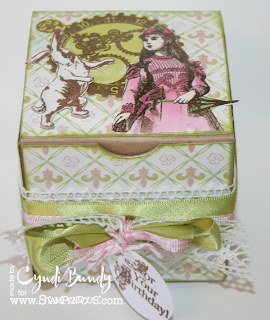
I started with a small 3" x 3" kraft box which I covered with new Delightful paper by Authentique.  Before gluing the pieces to the box I edged them all with Pearlescent Thyme Brilliance Ink from Tsukineko.  I then stamped Alice and the white rabbit from Stampendous' Wonderland set in Vintage Sepia Versafine ink by Tsukineko and embossed it with Clear detail powder from Stampendous!  The gear watch face in from the new Steampunk Gears coming SOON to a store near you!


Alice and the White rabbit were colored with Copic markers (R81,83,85, Y23, E0000,E000,G81, and CO)  These two images and the watch face were adhered to the top of the box.


I then wrapped May Arts white crochet ribbon along with Green satin PTI ribbon and pink gingham around the box and added a knot of the three tied into a bow.  My tag is stamped with one of the greetings from the Wonderland set and punched with a 1 3/8" circle then tied on with pink Bakers Twine.


Ihope you like my project today!  Please visit the Altered Alice blog for more inspiration from their team and the Stampendous! team AND for a chance to win one of three of the Wonderland sets!  

ALSO, don't forget to go back to the top of my blog and enter my Blog Follower Giveaway for another chance to win this set or one of three other prize packs!


Friday, April 6, 2012

Spunky Spooks Blog Hop

Its Blog Hop day at Simply B Stamps today and we are showcasing Verity Vamp, the last in the line of Spunky Spooks!  All images are available in the SBS store so go snatch them up!


Blog hop starts at the SBS Blog
Alison
and finishes back  at the SBS Blog.

Thursday, April 5, 2012

Wonderland

 This month Stampendous! is collaborating with The Altered Alice blog so the Stampendous! DT is showcasing the new Wonderland set all this month!  (Be sure to stop by both blogs to enter for a chance to win this set!)

Today this card is being featured on the Stampendous! blog so I am sharing it here as well!


1. Stamp Alice from Wonderland set and color with copic markers (B21,24,27; E0000,000,00, Y21,26; YG61,63; C0,1) then cut out and set aside.
2. Stamp birthday sentiment from Wonderland set with pale blue ink on scrap of white cardstock and cut with Dog Tag punch from EK Success.  Punch hole at top and tie blue silk May Arts ribbon through and into a bow.
3. Fold a 5.5" x 11"piece of pale blue cardstock in half.  Cut out center with a Nesting Circle die.  Cut out a slightly darker blue (start with a piece 5x 5")circle with same die)  Cut a larger circle so that you have a circle frame
4. Cut a white piece of cardstock with a circle Doily die. (I used Cheery Lynn Designs)  
5. Stamp smaller elements from Wonderland set in blue ink on blue cs base.   Layer white doily onto med blue and adhere, then adhere to blue base.


6. Adhere Alice to lower right side of card and tag to upper left side.  Add Steel Blue Glass Glitter randomly around frame with a wet adhesive.
7. Cut a 5" x 5" piece of navy cardstock.  Adhere to center of inside of card.  Position large sentiment from Birthday Assortment in center of opening, then open card and stamp in Versamrk ink.  Add White Detail EP and heat.


Hope you like her!  Be sure to enter my Blog Follower candy giveaway at THIS POST for yet another  chance to win this set or another fabulous prize!  And check back in this Sunday for a new Alice card from me for the Altered Alice blog! Hope you have a wonderful day!

Dream Scheme Thursday

Its time for another weekly dose of challenge from Dreamweaver Stencils.  This month we want to see May Flowers on your projects!  The challenge will run all month long and you can play as many times as you'd like!  The Dream Team will be posting new cards for the challenge every Thursday in April!


For today's post I am sharing one of the cards that I created for Dreamweaver Stencils for January CHA using the newly released Tall Poppy stencil.  I used the Double Glitter technique for the poppies and the sentiment, using glitters from Stampendous!


I have a tutorial on my blog HERE if you want to follow along with how to do this technique.  Also, I will be teaching a Double Glitter Technique card class this month and next locally!  See class dates above :)


Also, don't forget to hop over to my fellow Dreamweaver Stencils DT blogs':

Wednesday, April 4, 2012

More Spunky Spooks!

 Are you enjoying all the peeks of the new Spunky Spooks at Simply B Stamps?  We sure are :)  In fact, we are doing an EARLY release tonight these images will be up in the store for purchase!

Tonight I have for you Lorna Loch and Lucy Lycan.  First up is Lorna!  Poseidon beware...this chick will best you in any fight!  I've colored her with copic markers to match papers from Bo Bunny with a bit of a mermaid color theme going on!  My yummy fat two-toned ribbon is from May Arts.


Here's a closer look at Lorna and her baby (Loch) Nessie monster :)


And today's peek is of Lucy Lycan.  I pulled out some old Pink Paislee papers that I've been hoarding for this one :)  And just look at her cute little Lex, I want one!!


Be sure to hop over to the Simply B Stamps blog for more peeks, and don't forget to join us for the Spunky Spooks Hop this Friday!

Challenge List:
Ribbon Carousel: spring colors
Fairytale Challenge: everything goes
Crafty Catz: use a digi image
Sketch Saturday: sketch first card

Monday, April 2, 2012

Haunting Hannah and Hoot

Its day 2 of peeks for the new Spunky Spooks line from Simply B Stamps and today we are introducing Haunting Hannah and Hoot!  My ghostly gal just couldn't wear ordinary ghost white so I gave her a lime green dress for spooking!  And, best yet, she is complete with chains for rattling!


I cut Hannah out with a Nesting Circle die then a gray mat with Nesting Doily circle die, both from QuicKutz for Lifestyle Crafts.  Papers are from Graphic 45, Bo Bunny, and 3 Bugs in a Rug.  Hannah's chains were colored with a silver spica pen from copic, the rest of her in copic markers.


I used this weeks Deconstructed Sketch for my layout:


And this weeks color combo from Color Throwdown:


Be sure to head to the Simply B Stamps blog to check out what the rest of the DT has created :)


Challenge List:
Party Time Tuesday: anything goes
Simon says Stamp: anything Goes
Make It Monday; Linky party
Marks' Finest Papers: Make it Square

I won last week's challenge from Mark's Finest Papers, how cool!!  Thanks!

Sunday, April 1, 2012

Are you Mad?

We're all mad here in wonderland at Simply B Stamps!  Meet The Hatter from the Alice in Wonderland Chibis collection by Simply B Stamps.  Is he Johnny Depp to a tee or what?


I started by pulling some bright wild colors to coordinate with Johnny's reddish orange hair, added the Clockworks cuttlebug folder to the orange layer, and a sentiment from my digi files.


If you haven't seen the whole Wonderland collection, be sure to check it out on the Simply B Stamps blog! And don't forget we start previews there tonight for our next release coming out this FRiday, so don't be late for this very important date!

Thursday, March 29, 2012

Thursday Dream Scheme

 Its time for another Dream Scheme Thursday from Dreamweaver Stencils.  This is the last week of Spring Clean and Simple and then we will have a new challenge for you next month!  Today's card I started with the Large Damask stencil and Glossy White Embossing Paste.  While the paste was still wet I added Ultra Fine Crystal Multi Glitter from Stampendous!


Here's a closeup shot of how pretty and blingy this technique looks!  My background paper is from the Basic Grey Kissing Booth line.


To finish the card I added the sentiment using the Happy Mother's Day stencil and the same technique as above.  This was then popped up over some satin PTI ribbon.


Be sure to check out what the rest of The Dream Team has created today and stop by the Dreamweaver Stencil blog to add your creation for a chance to win!


Challenge List:
Dreamweaver Stencils: Spring Clean and Simple (DT)
The Stamping Boutique:sentiment focus
The Crazy Challenge:add a sentiment
Make it Mondays: linky party
Speedy the Cat: shades of pink