Showing posts with label Glue Arts. Show all posts

Monday, September 27, 2010

I'm up for Method Monday this week at InStyle Stamps and I thought it would be fun to play around with some acetate! There are so many cool things you can do with acetate and I want to show you a couple of them today!

I am using a sheet of acetate for my card front that I cut down from a 8.5" x 11" piece that I bought in a pack. It can also be purchased in smaller sheets as well as in pre-scored cards. Once I cut my piece down to an A2 card size I simply scored it with my Sor-Pal.


The next thing I did to it was to run it through my Cuttlebug with an embossing strip to hit just the edge. It leaves a cool white look to the part that was embossed.


If the embossed part doesn't appear as dark as you'd like you can also sand over as I had to do with this card so that it would be more pronounced.


For my image I used Cupcake Chloe, one of my favorites from the Chloe collection from InStyle Stamps. She was colored to match the cute Sweet Shoppe papers from Collage Press. I then took a few of the papers from this collection and added them randomly to the acetate card base.

(I tried coloring in the flowers on the edge, another thing you can do with acetate if you have Copics or other alcohol based markers. It looked kind of cool but my colors weren't quite right. Instead of starting over I just used some Copic refill solution to "erase" the color! Remember when coloring directly on the acetate that you need to use darker colors)


I punched a circle from an extra piece of acetate then stamped a cupcake with Staz-on and added glitter to the edges using PVA glue and Stampendous! pearl glitters.


To attach my papers to the acetate I chose to add glue to the backs on the parts that would not show through the card. You can also use a really invisible glue such as Zip Dry or use eyelets. For the small acetate circle I simply added a dimensional adhesive (from Glue Arts U Cut It pak) behind the cupcake so that it would not show through.


Here's what the finished card turned out like. (The top view is below).


Thanks for joining me today! Why don't you give acetate a try? You should be able to find it at any craft store :)

-Cyndi

Friday, September 24, 2010

InStyle Stamps Blog Hop!!

Hop, Hop!! Its time for this months Blog Hop at InStyle Stamps! If you arrived here from the fabulous Angelique's blog then you are right on track! (If not, go back to the InSTyle Stamps blog to start!) This month we have a fall theme for you and I decided to use Janice and do a back to school project.


More on my project in a minute, but first a few updates for you from InStyle on lots of prizes you can win!

You have until Sunday Sept 26 at 12pm EST to participate in the OWH Birthday Bash...details at THIS POST.

We have had a blast having Glue Arts as our sponsor this week! The DT was given a fabulous goodie pack to work with AND you can win one too! Just leave comments on all the new release posts at the ISS blog from the last week by Sunday Sept 26th at 12pmEST to qualify! Go to THIS POST for more details!

InStyle is also offering a FREE digi to 2 random commenters on the DT's blogs this week. Be sure to hop around during the hop and leave some comments from the rest of this weeks new release posts at each stop for an extra chance to win!

Finally, at the end of the Blog Hop be sure to vote for your favorite project and leave a comment on the ISS blog. The randomly chosen winner receives a $25 value goodie bag from InStyle!

Whew, LOTS of ways to win today!! Now back to my project!


I used a cute little lunch tin from the Target $1 spot that's been in my stash of alterables for a couple of years, hehe. I covered the tin with papers from the "Learning Curve" paper line from Bo Bunny, then colored Janice to match. She was the distressed along with all the elements with Tim Holtz "Old Paper" ink.


Of course the top is done up with lots of fun ribbons from my stash...its a good way to use up scraps! I added the word "Change" to the back of the little tin and thought I would give it to one of my daughters to keep their change in in their backpack. They both admitted the other day that when they were young they used to just throw it away! Aaaaacckkk! Now they are 14 and 15 and know the value of scrounging up dimes and nickels for a soda at school, LOL. (And don't ask who gets this....its whoever reads moms' post on facebook then does the dishes tomorrow!)

OK, now on to the rest of the hop! From here head over to the talented lady Kimme to see what she has cooked up for you today! Thanks for hopping by my corner of cyber space today! Have a great weekend!

-Cyndi

Thursday, September 23, 2010

Amelia Chloe Sneak Peek & more Glue Arts

Post 2 of 2 today! Scroll down for my Pixie Dust Studio challenge post for this week!

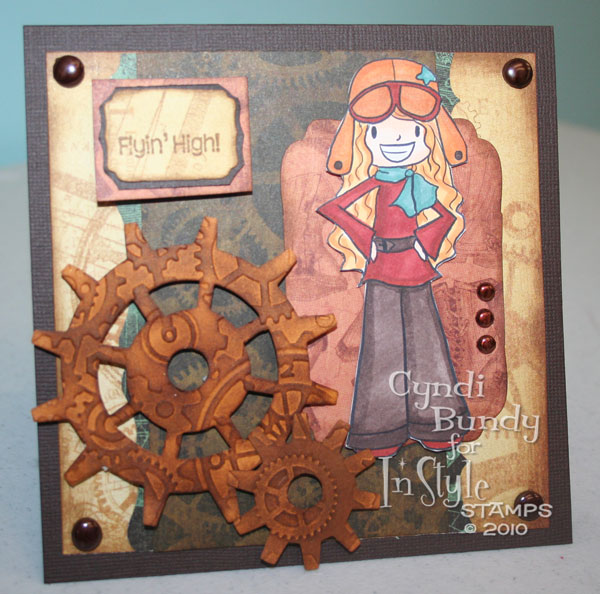
Here's my snek peek of Amelia Chloe for InStyle Stamps! She's one of many new Chloes that we are releasing tomorrow in the ISS store.

This Chloe is my favorite from this release, I think she is just the bomb! I had to pair her with some fun Steampunk Debutante papers by Graphic 45 and then I cut these fun Gadget Gears from my Tim Holtz Alterations dies.


Its also still Glue Arts week over at InStyle Stamps. For this project I used the Raise 'n' s that were part of the Combo pack that I received. They are like a cross between pop dots and glue dots. AND they can be trimmed to a smaller size if thats what you need. I used the Raise 'n' s on Chloe to give her some dimension, then I used the U cut Its on the Gears (from the same combo pack) on the gears so they are raised a bit higher, and I could cut the strips into thin yet long strips.


For the brads, I cut the prongs off the backs of them with my Tonic Scissors so that they are flatish on the back. Then I pushed these onto the Mini Square adhesive roll to pick up a small adhesive piece. I loved these cause they are also great to roll where you want them on a small strip of paper if you need just a touch of adhesive!


Here's the photo I showed you the other day with all the awesome goodies that Glue Arts sent all the ISS Design Team! AND they sent enough for us to have this same package of Glue Arts goodness for one lucky winner this week! Be sure to check into the InStyle Stamps blog for all the details!


Thanks so much for hopping by today, and don't forget that tomorrow is Blog Hop Day!
-Cyndi

Monday, September 20, 2010

InStyle Stamps Sneak Peek Chloe & Glue Arts Review

Its release week again at InStyle Stamps! We have lots of new Chloes for you this week :) My sneak for today is called "Raindrop Chloe" and will be available at the end of this week in the InStyle Stamps store!

We are also proudly teaming up with Glue Arts this week. Let me tell you, I have been a Glue Arts fan for over a year now. Their Glue Glider is my go-to adhesive of choice, but more on that tomorrow!

Glue Arts generously gave out InStyle team a TON of product to work with! I was soooo thrilled since I already love the stuff! Here's a shot of all the goodies:

They ALSO were kind enough to donate some goodies for a lucky winner this week! Head to the ISS blog for details on how you could be the lucky girl!

Today I used my Glue Glider Max, (that I already had), another all time favorite! I tend to use it when ever I scrapbook because it REALLY stays!! This stuff will hold something to the wall if you want!

So, for this project I did a lot of sewing on the panels and I needed something to make sure the layers wouldn't come apart over time. The adhesive I have in the gun now is the 1" so that it really wide too to cover the stitching. (I also have the 1/2" cartridge which is closer to the size of what would be in the Glue Glider Pro...the cute pink one)

But I also want to show you a couple of nifty NEW to me products also by Glue Arts. I am a HUGE fan of dimensionals. I go through tons and tons of them. And I have them in like every size. I had never tried the ones that come in a big sheet before, but I REALLY like being able to cut the size that I want! This product is also terrific because not only does it really stick but the liner comes off without a fight!! 2 more pros for me!


Here's a shot of what it looks like in the packaging. This is a combo pack. I used the "U cut it" for todays project and Thursday I will show you the "Raise n's". Also today I used the ribbon adhesive. I snipped off a bit and attached it directly to my ribbon, this way the ribbon won't slide around on my card! Totally cool, AND it really sticks!!


OK!! So, be sure first off to head to the InStyle Stamps blog for more eye candy today and all this week! I will be back Thursday with a NEW peek for you and also featuring more Glue Arts products!

Thanks for coming by!

-Cyndi

Monday, September 13, 2010

InStyle Stamps Sneak Peek

Its time for sneak peeks all this week at InStyle Stamps! We are having a big release at the end of the week, filled with LOVE!! Be sure to hop by the ISS blog all week for lots of peeks :)


This is Mailbox Love. Isn't it just adorable? Since the theme was rather love related I paired it with some "Love Bandit" paper from Bo Bunny to pick my colors.

Just a quickie post for today, but I have more sneaks later today and tomorrow for you, so be sure to check back in!!

-Cyndi